Zelvoid Possession Model Kit from e2046.com
"Flawless design on this very fun to build kit"
/5 Reviewed by Adi MursecI’ve always been a big fan of super robots, I grew up watching Transformers and over the years my love for mecha has evolved into all the other types of super robots from Gundam, Evangelion and Mazinger Z.
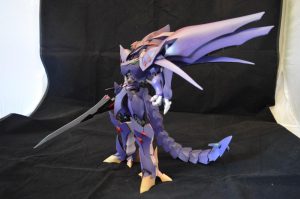
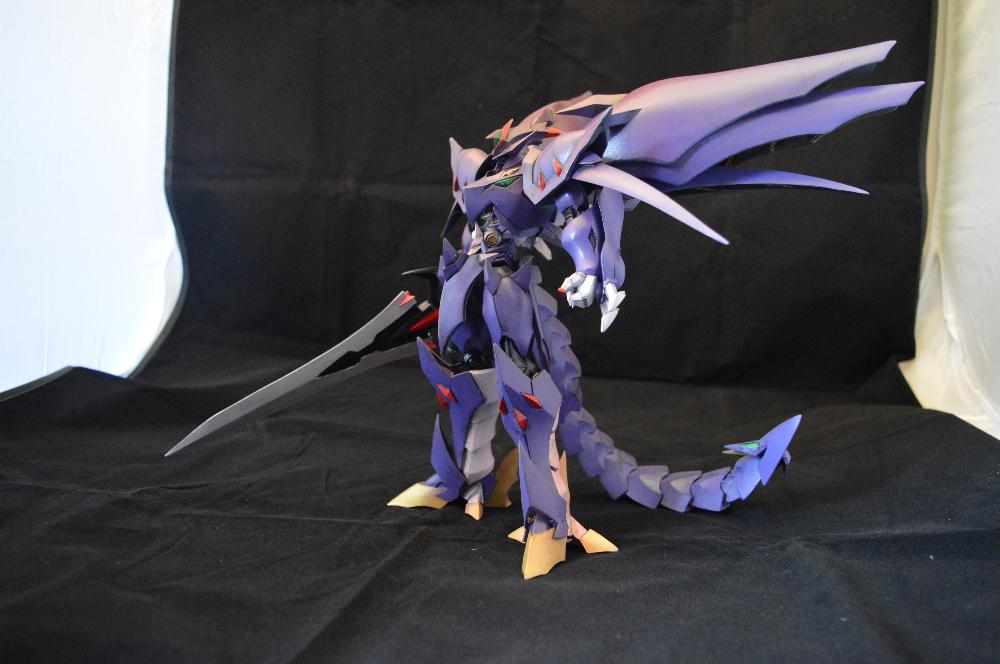
The kit mentioned in this review comes from e2046.com – Zelvoid Possession.
This kit is based on Zelvoid from Super Robot Taisen/Super Robot Wars and is very similar to Cybuster. They are both well grounded characters in the game series which pays massive tribute to just about every super robot series ever made.
This is a resin model kit / statue, unlike the Gundam type of kits you get from Bandai which just click together these ones take a little more work but it’s well worth all the hours you put into it. The finished product is similar to the kind of statues you see in comic shops. Although you do have to do more assembling and painting yourself you end up with a truly unique item as you can customise it, change the pose and even swap parts and do a full kitbash.
The Zelvoid Possession kit is another one of those epic kits which is made available thanks to the team at e2046.com who have hundreds of model kits available, most of them rare out of print kits like the original FFVII ones and numerous robot kits like the MG Kshatriya which Bandai never got round to releasing.
I’m still fairly new to the resin kit hobby, it’s been a big learning curve but they have each been a lot of fun to work on. So far this is probably the most complicated one I’ve built compared to the others which include a Great Mazinger Statue and huge Evangelion Beast 2.0 statue.
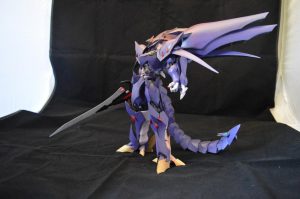
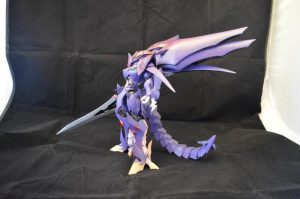
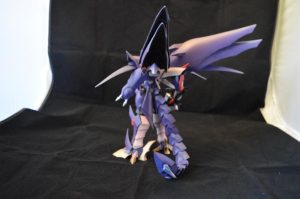
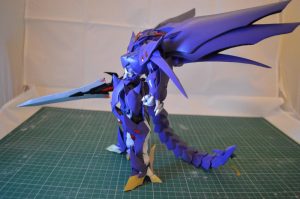
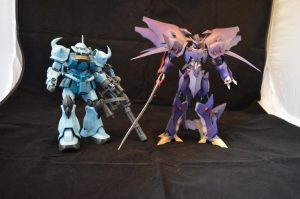
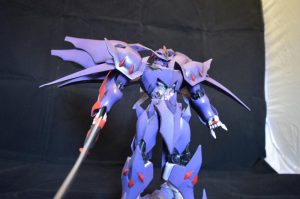
The finished product stands about 10 inches tall and each wing is about 6 inches long so it’s pretty impressive kit once you put it together.
Design wise it’s very impressive, the main body leaves a little room to customise the pose, but when you assemble those massive wings and tail it really comes together.
Model making is as much an art as painting a canvas, everyone does it a little differently and nobody is wrong, use whatever paints and materials you are comfortable with. Even if it doesn’t come out perfect in the end at least you have had fun building it and will have learnt something for the next kit.
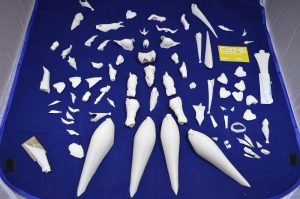
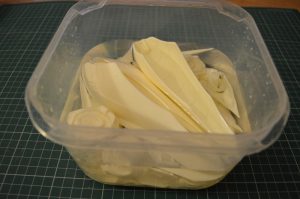
Phase one: Checking parts
Like any resin kit you’re probably going to want to lay out all the parts and see what’s what. You don’t get instructions with this one but I don’t think they are really needed.
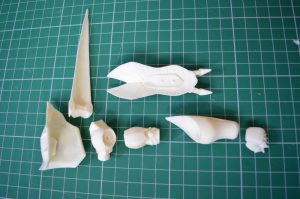
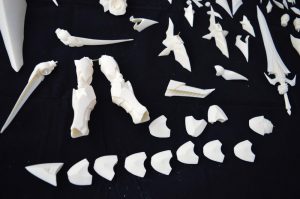
Phase two: Smoothing parts
This kit was well cast as you can see from the earlier pictures but with all resin kits you will need to cut off and sand down the ends where the parts have been moulded. For this I’d recommend using some model clippers and then sanding sponges to smooth out the rough ends. In the past I’ve used diamond sanding files but they are harder to use and didn’t give as good a finish. Also after a few uses files tend to lose their finish where as sand paper or sanding sponges can be cheaply replaced.
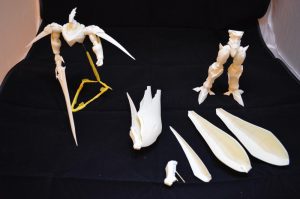
Phase three : Test fitting
Before you paint or glue parts together you may want to try a test fitting, This could be pinning a few or all the parts together or just seeing if they all sit next to each other smoothly. You may want to start pinning parts or at least drill the holes. With smaller kits less than 6 inches tall you might get away with just using super glue and epoxy putty but for anything over 6 inches and especially with the massive wings and tail this kit comes with you will need some pins. I use a small model hand drill for this, you can buy pins from a model shop but I used bars from an old bird cage cut out with pliers. They do the job and I got hundreds of them from recycling the cage instead of throwing it out.
Phase four : Washing parts
Once it’s been sanded and all fits together you’re almost ready for painting. We’ll need to wash the parts in mildly soapy warm water, this will pull off the casting release agent which resin kits tend to have, it’s invisible in most cases so best to make sure. Also this will remove any dust from the sanding process.
Phase five: Assembly
At this point I assembled the arms, legs feet with pins and epoxy. I haven’t assembled everything at once because some parts are just easier to paint first and assemble later.
Phase six: Painting
Like I mentioned model kits are just as much art as painting a canvas, some people use acrylic, some people using acrylics, some people spray and some people hand paint. It’s up to you what kind of paints you use and how you paint it. For this one –
- Airbrushed a black base coat
- Airbrushed the purple parts, this took a lot of Tamiya gloss purple
- Masked off bits around the white and then airbrushed those on

Phase seven: Final Assembly
At this point the limbs have been assembled and it’s all been painted with a base coat and main colour. I started with assembling the feet and worked my way up. This was to make sure it stays balanced and the feet are flat on the surface and pin the legs on with the lower torso. Once that was all firmly set and cured with epoxy putting I did the same with the upper torso and arms.
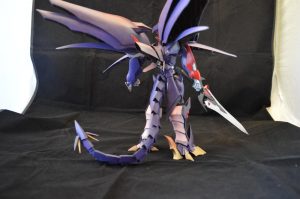
The wings are very heavy on this kit so you might want to pin the tail together before adding those. The tail is made up of 10 or so parts which you can pose in whatever position you want. At one point I was thinking of having a scorpion like tail going over his shoulder but I decided to use the tail to give him more balance.
The head I left until the very end so I could paint it separately without having to hold the whole model
Phase eight: Final painting
Everything has been assembled and has a coat of paint on but at this point I painted on detail, blended in paint between joins as the putty and pins might leave a few signs of assembly. Once I was happy with it I glued the head on and then did a final coat of clear satin finish to protect the paint and give it an even finish.

Overall it’s an amazing kit, each one I’ve made from e2046.com has massively impressed me, they aren’t the only online shop for kits but I find their selection is second to none, the prices are great and it’s easy to order from. They also have a lot of perks like you can submit a gallery of your finished kit and have a chance of winning a voucher or could even enter it into their annual competition which gives out $500 to the winner, that could buy a lot of model kits.
I’ve uploaded 100 photos of this build from start to finish to a Zelvoid gallery on e2046.com
Posted by Adi Mursec on February 18, 2017